ESBA Apiarist

How to assemble your brand new Denrosa/Swienty Poly Hives

Rate this Entry
Tools: two hands. Paint brush. Radiator paint roller and paint tray. Hammer and roofing nails to fix mesh.

Time: one minute to assemble a box. Four sessions to complete painting (time depends on the care you take).

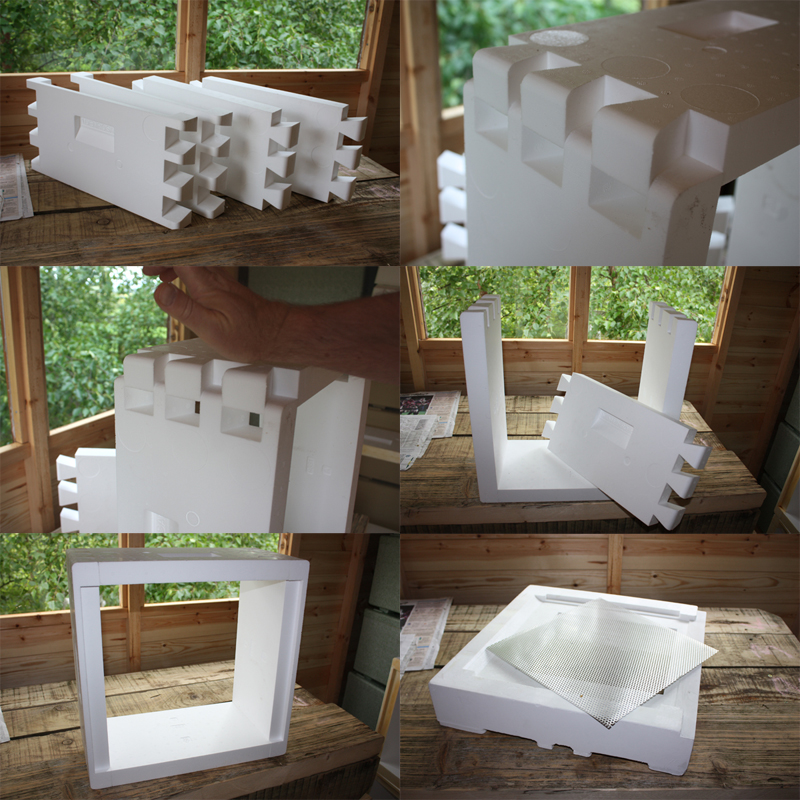
1. Admire the sleek outlines, the craftmanship and the light weight compared to timber. Ignore the lack of biodegradability. Note that the brood box pieces come in two types, tapered lugs (front and back panels) and straight-sided lugs (side panels).
2. Push straight-sided lugs into tapered lugs.
3. Whack 'em in with the heel of the hand (easy peasy).
4. Make sure that you finish with the straight lugged piece otherwise you might have to take it apart. I'm told that broken lugs can be be repaired with a 3" nail and glue.
5. Admire the finished product which should have taken no more than 1 minute to assemble.
6. Floor? All you need do is nail in the mesh with half a dozen roofing tacks. Do it later.
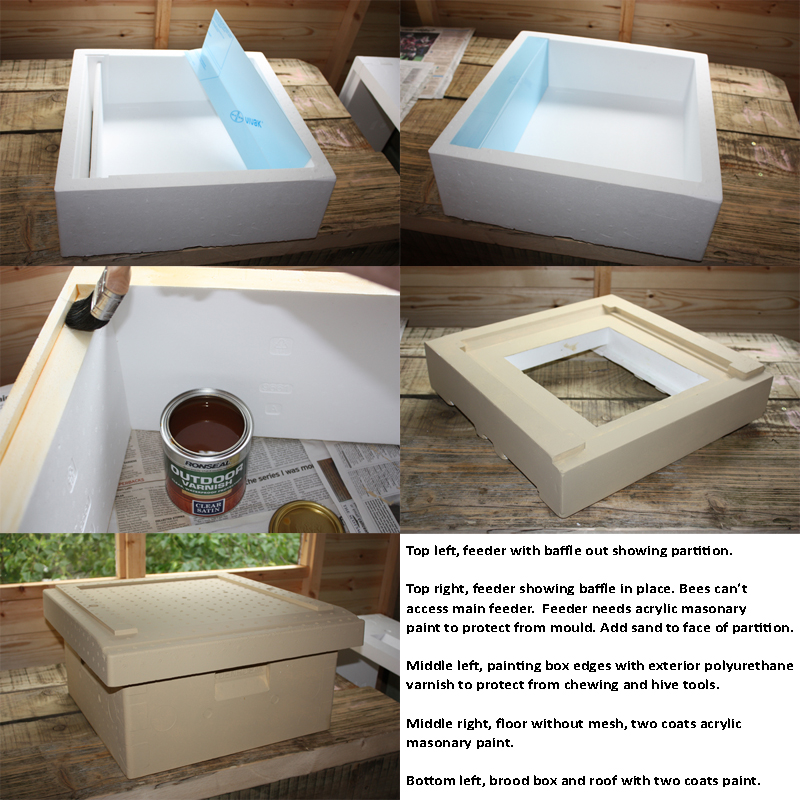
7. Feeder? One piece plus a plastic cover. All you need to do is paint the slope bees crawl up and down (the one on the right side of that partition) and sprinkle sand on it for bee traction, and also paint the inside of the feeder to stop syrup seeping into the feeder and causing mould. Note with a smile that the plastic cover/baffle was made by Bayer.
8. Put the feeder baffle in place to see what it looks like but this box needs painted internally.
9. Paint the rims and the insets for the frame lugs with polyurethane exterior varnish, to protect from bees' mandibles and hive tools.
10 & 11. Paint all the outsides with two coats of acrylic exterior masonary paint. I used B&Q paint, other makes are available. Murray uses oil paints instead. A radiator paint roller makes the job straightforward. The big boys find an industrial air paint sprayer and do it in quantity against a wall of disused drums and once the neighbours aren't looking.


If you are all wondering where to get them, Murray McGregor at Denrosa, Coupar Angus sells them. Roughly £15+VAT per unit. He's a (very) busy bee farmer rather than a retailer so plan your visit for the quieter months would be my advice. In perhaps a year there will be a more organised method of sale.

Submit "How to assemble your brand new Denrosa/Swienty Poly Hives" to Digg Submit "How to assemble your brand new Denrosa/Swienty Poly Hives" to del.icio.us Submit "How to assemble your brand new Denrosa/Swienty Poly Hives" to StumbleUpon Submit "How to assemble your brand new Denrosa/Swienty Poly Hives" to Google

Updated 21-05-2011 at 12:46 AM by ESBA Apiarist

Categories
Uncategorized

Comments

  1. Trog's Avatar
    If they have to be varnished to protect against chewing and hive tools, how long will it take the average mouse to get in? Someone I know had all his plastic screwdriver handles reduced to powder by the wee beasties!
  2. gavin's Avatar
    Interesting question. Where these boxes are destined has mice that chewed the bottom bars off frames! There were also rats gnawing the entrance of wooden Thornes hive, but since the site owner's chickens were given away the place look less likely to attract them. I'll ask when I next see Murray. The narrow entrance stops them getting in I think, so maybe out in the open they just don't see the hives as a target. I might worry more about mice in the storage shed, but there will be foundation and all sorts of things in there for them to play with, so some kind of rodent control is a must.
  3. gavin's Avatar
    Just thought that I'd add that the Swienty polys are untouched by rodents, but a couple of the Paynes nucs which were out all winter have had their entrances enlarged by sharp little teeth. I now need to think of a way of repairing and strengthening them.
  4. brecks's Avatar
    I planned to varnish the frame rests of my poly hives following the above post and bought the same varnish pictured. When I read the contents, I found it was not a polyurethane varnish as described and of course, not clear. I 'phoned Ronseal to ask if it was suitable for expanded polystyrene and they said NO - the solvents in it would melt the polystyrene. I would be interested to know what happened to the pictured hive parts.
  5. gavin's Avatar
    Hi Brecks - quite right, having checked it isn't polyurethane after all. However the two coats I gave the recesses and the rims went on and dried down as expected. No issues with melting polystyrene and a tougher surface to scrape off propolis and wax. Gavin/ESBA Apiarist.
  6. brecks's Avatar
    Quote Originally Posted by gavin
    Hi Brecks - quite right, having checked it isn't polyurethane after all. However the two coats I gave the recesses and the rims went on and dried down as expected. No issues with melting polystyrene and a tougher surface to scrape off propolis and wax. Gavin/ESBA Apiarist.
    Gavin,

    Thanks for your reply. Since writing my comment, I have also been told that some people use solvent based paints and varnishes on poly hives because they melt a fine layer of the poly surface thus forming a better bond than water based products.

    Brecks.